Setup Instructions
Note - this material exists in the ARENA repo, on the
mainbranch.
There are 3 main ways to access the course:
-
Colab. Each day of exercises has 2 Colab notebooks (linked at the top of the exercise page on this website). The "exercise Colab" leaves functions blank for you to fill in, and the "solution Colab" exists as a reference. This option doesn't rely on this website at all - the content is self-contained in the notebooks. Recommended if you want to avoid environment setup.
-
VS Code (blank files). Clone the ARENA repo and create a blank Python file in the exercise directory (e.g.
chapter0_fundamentals/exercises/part1_raytracing/answers.py). Read through exercises on this website, copying code blocks and filling in solutions. Run chunks of code using# %%cell delimiters or VS Code's "Execute Selection" (Shift+Enter). Strongly recommended for in-person ARENA participants. -
VS Code (notebooks). Same as Colab, but working from the
.ipynbfiles in the cloned repo. Make a copy of the exercises notebook before starting - otherwise pulling updates will overwrite your work.
Important: Don't mix notebook and website instructions! Each option is self-contained with slightly different setup code.
Repo structure
.
├── chapter0_fundamentals
│   ├── exercises
│   │   ├── part1_raytracing
│   │   │   ├── 0.1_Ray_Tracing_exercises.ipynb
│   │   │   ├── 0.1_Ray_Tracing_solutions.ipynb
│   │   │   ├── solutions.py
│   │   │   ├── tests.py
│   │   │   └── utils.py
│   │   ├── part2_cnns
│   │   ⋮    ⋮
│   └── instructions
├── chapter1_transformer_interp
├── chapter2_rl
├── chapter3_llm_evals
└── requirements.txt
Each day has its own directory containing exercise/solution notebooks, solutions.py, and sometimes tests.py and utils.py.
Exercise format
Each day typically takes ~1 day to complete and usually follows this rough structure: Reading Material → Setup Code → Exercises (several sections) → Bonus (optional).
Exercises come with difficulty/importance ratings and time estimates:
If you're spending significantly longer than suggested, use the provided solution and move on. Getting stuck on one exercise can block progress through the course.
Solutions appear in dropdowns below exercises. Use hints liberally - they're designed to help you focus on what matters.
VS Code setup
Skip this section if using Colab (Option 1).
System requirements
- GPU: 8GB+ VRAM (12GB+ ideal). We recommend RTX 3060 or RTX A4000 - see pricing on VastAI. For heavier-duty exercises (e.g. sections 4.X of the alignment science chapter) you might need an A100, but the rest of the content here assumes you're using RTX 3000-series or A4000/A5000.
- RAM: 16GB is plenty (rule of thumb: 2x VRAM).
- Storage: 50GB should suffice.
- Bandwidth: 100Mbps+ recommended for downloading models/datasets.
GPU comparison table (VastAI pricing)
| GPU Model | VRAM | Performance (FP32 TFLOPS) | Cost (USD/hour) |
|---|---|---|---|
| RTX A5000 | 24GB | 27.5 | ~0.22 - 0.27 |
| RTX A4000 | 16GB | 20.6 | ~0.15 |
| RTX 3090 | 24GB | 35.3 | ~0.25 - 0.3 |
| RTX 3080 | 10GB | 29.2 | ~0.20 |
| RTX 3070 | 8GB | 19.8 | ~0.11 - 0.16 |
| RTX 3060 | 12GB | 12.0 | ~0.10 - 0.16 |
| Tesla V100 | 16GB | 12.5 | ~0.25 |
Local setup
If your machine meets the requirements:
conda create --name arena-env python=3.11
conda activate arena-env
git clone https://github.com/callummcdougall/ARENA_3.0.git
cd ARENA_3.0
pip install -r requirements.txt
Tips for MacOS
- Set
device='mps' - Enable CPU fallback:
PYTORCH_ENABLE_MPS_FALLBACK=1 - For DataLoaders, add
multiprocessing_context="fork"to avoid memory crashes
Cloud VM setup
We recommend VastAI (cheapest, most flexible) or Lambda Labs (easiest setup). See the comparison table and provider-specific instructions below.
| Feature | VastAI | RunPod | Lambda Labs |
|---|---|---|---|
| Cost | Cheapest ($2/day when active) | Mid-range | Most expensive (~$0.50-0.80/hour) |
| Setup | Minimal pre-installed libraries | Some pre-installed | Most user-friendly, PyTorch pre-installed |
| Pausing | Easy pause, low idle costs | Can pause | Cannot pause without data loss |
Setup instructions for Lambda Labs
Instructions for signing up
Sign up for an account here.
Add an SSH key (Lambda Labs gives you an option to create one). Give it a name like arena_key.
When you create it, it will automatically be downloaded. The file may have a .pem extension - this is a common container format for keys or certificates.
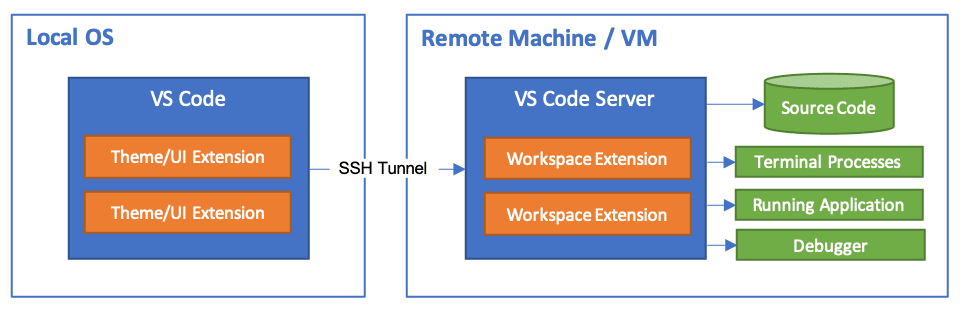
VS Code remote-ssh extension
The remote ssh extension is very useful for abstracting away some of the messy command-line based details of SSH. You should install this extension now.
At this point, the instructions differ between Windows and Linux/MacOS.
Windows
Having installed the SSH extension, Windows may have automatically created a .ssh file for you, and it will be placed in C:\Users\<user> by default. If it hasn't done this, then you should create one yourself (you can do this from the Windows command prompt via md C:\Users\<user>\.ssh).
Move your downloaded SSH key into this folder. Then, set permissions on the SSH key:
- Right click on file, press "Properties", then go to the "Security" tab.
- Click "Advanced", then "Disable inheritance" in the window that pops up.
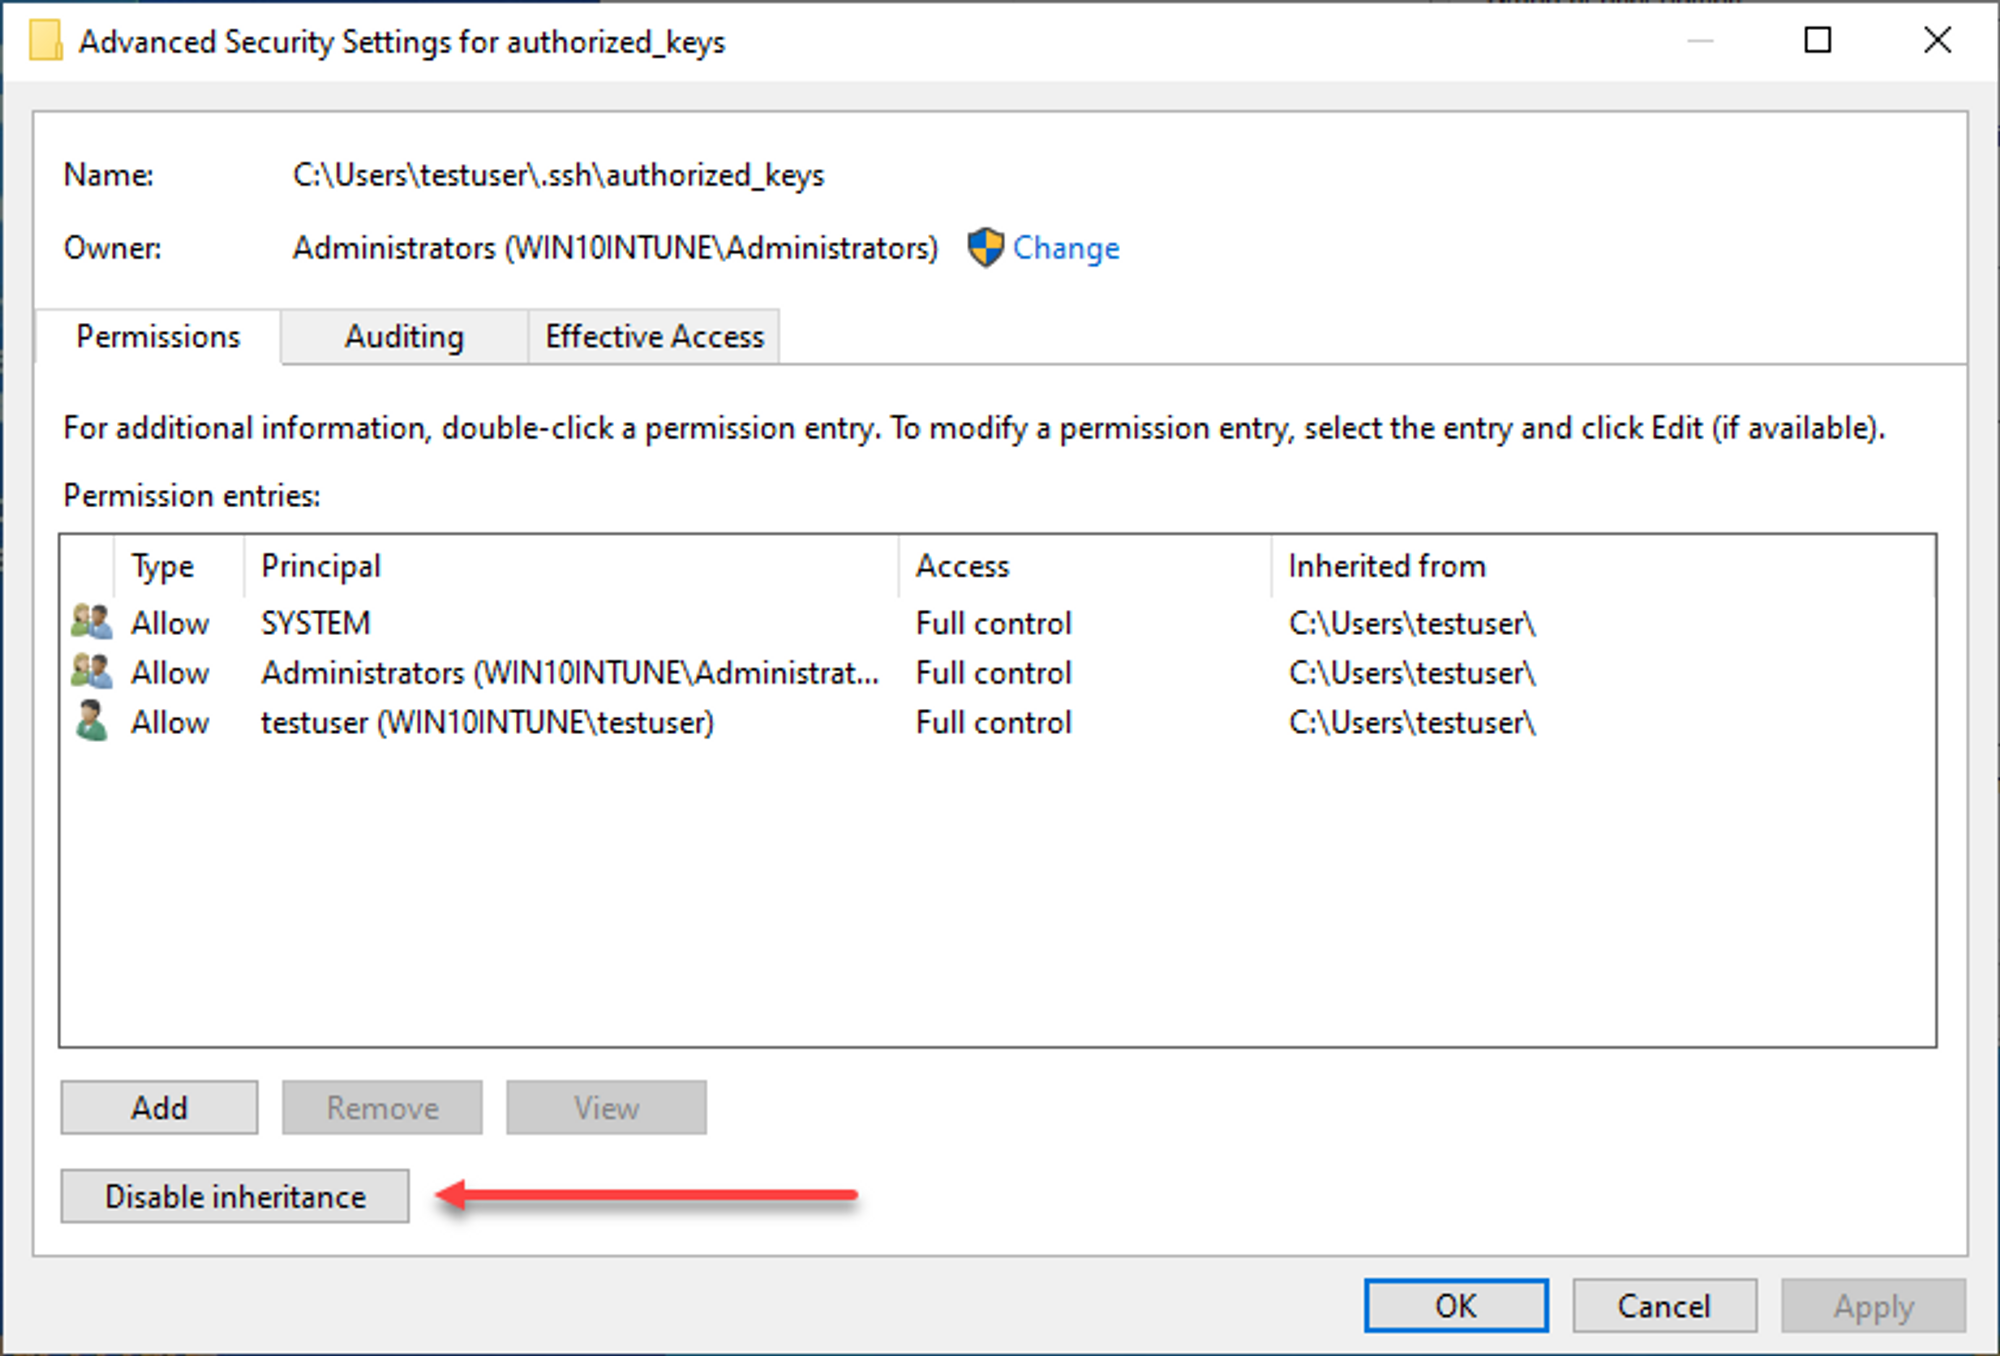
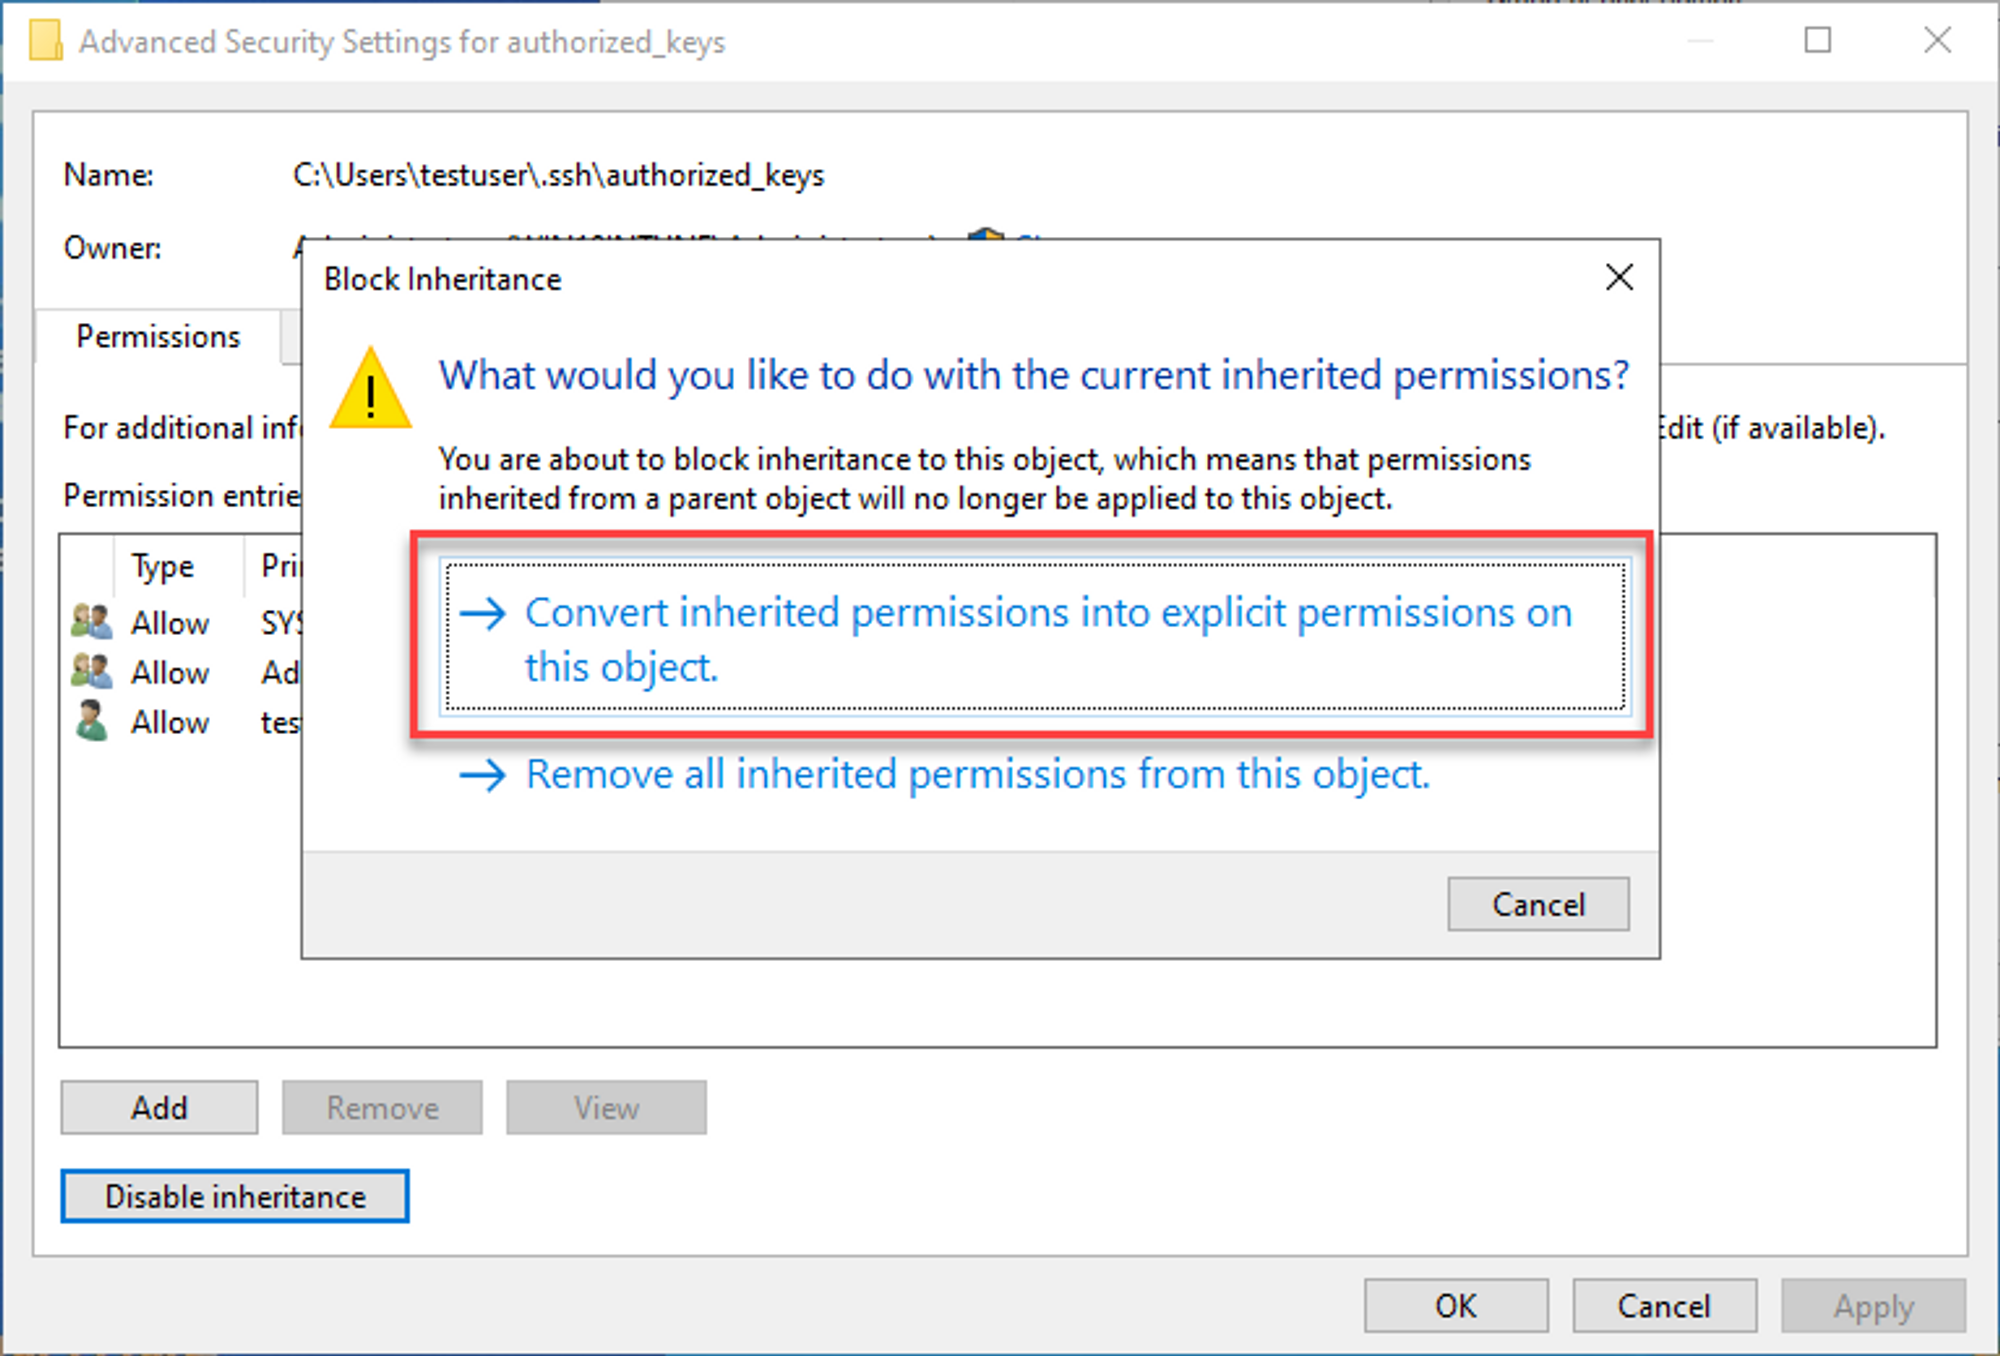
- Choose the first option "Convert inherited permissions…"
- Go back to the "Security" tab, click "Edit" to change permissions, and remove every user except the owner.
- You can check who the owner is by going back to "Security -> Advanced" and looking for the "Owner" field at the top of the window).
Linux / MacOS
- Make your
.sshdirectory using the commandsmkdir -p ~/.sshthenchmod 700 ~/.ssh. - Set permissions on the key:
chmod 600 ~/.ssh/arena_key
Launch your instance
Go back to the Lambda Labs website, navigate to "instances", and click "Launch instance".
You'll see several options, some of them might be greyed out if unavailable. Pick an A100 if possible; otherwise an A10 will also do for most exercises in this course.
Enter your SSH key name. Choose a region (your choice here doesn't really matter for our purposes).
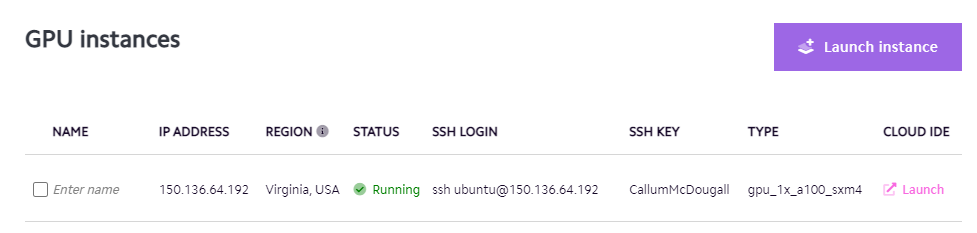
Once you finish this process, you should see your GPU instance is running (and see information like the user & IP address which we'll need later):
Connect to your instance
Now, you should set up a config file (which gives you a way to connect to your instance in a new window without the need for long command line arguments). Open the command palette (this is Ctrl + Shift + P for Windows, Cmd + Shift + P for Mac), search for the option "Open SSH Configuration File...", then click on the option C:\\Users\\<user>\\.ssh\\config for Windows / ~/.ssh/config for Linux/MacOS. If you haven't used this file before, then an empty config file will open. You should copy in the following instructions:
Host arena
    HostName <ip-address>
    IdentityFile <path-to-ssh-key>
    User <user>
where <ip-address> and <user> come from the SSH LOGIN field in the image above, and <path-to-ssh-key> is the path at which you saved the SSH key. For example, in my case this would look like:
Host arena
    HostName 150.136.64.192
    IdentityFile C:/Users/calsm/.ssh/arena_key
    User ubuntu
Next, open the command palette again and search for "Connect to Host...". When you select this, the host arena should appear as one of the hosts - choose this option. A new VS Code window will open up. If you're asked if you want to install the recommended extensions for Python, click yes. If you're asked to choose an OS (Windows, Mac or Linux), choose Linux. When this is done, click on the file explorer icon in the top-left, and open the default directory (this will probably be ubuntu or root, on which provider you're using).
And there you go - you're all set!
Setup instructions for RunPod
Instructions for signing up
Sign up for an account here.
If you don't have a private/public SSH key pair, then create one by running the command ssh-keygen -t ed25519 (in Windows PowerShell if you're using Windows, or Terminal if you're using Linux / MacOS). This generates a private key (saved as id_ed25519 by default) and a public key (saved as id_ed25519.pub by default). You can add a key name by running ssh-keygen -t ed25519 -f ~/.ssh/arena_key, which saves the private key as arena_key and the public key as arena_key.pub. Make sure you know where it was generated (later in the instructions, you'll move it into the right folder).
Now add the public key (including user@hostname) to RunPod in Account → Settings → SSH Public Keys.
VS Code remote-ssh extension
The remote ssh extension is very useful for abstracting away some of the messy command-line based details of SSH. You should install this extension now.
At this point, the instructions differ between Windows and Linux/MacOS.
Windows
Having installed the SSH extension, Windows may have automatically created a .ssh file for you, and it will be placed in C:\Users\<user> by default. If it hasn't done this, then you should create one yourself (you can do this from the Windows command prompt via md C:\Users\<user>\.ssh).
Move your downloaded SSH key into this folder. Then, set permissions on the SSH key:
- Right click on file, press "Properties", then go to the "Security" tab.
- Click "Advanced", then "Disable inheritance" in the window that pops up.
- Choose the first option "Convert inherited permissions…"
- Go back to the "Security" tab, click "Edit" to change permissions, and remove every user except the owner.
- You can check who the owner is by going back to "Security -> Advanced" and looking for the "Owner" field at the top of the window).
Linux / MacOS
- Make your
.sshdirectory using the commandsmkdir -p ~/.sshthenchmod 700 ~/.ssh. - Set permissions on the key:
chmod 600 ~/.ssh/arena_key
Launch your instance
Go back to the RunPod website, and navigate to "Community Cloud". You'll see several options, including (hopefully) A100s.
You'll see several options, some of them might be greyed out if unavailable. Pick an A100 if possible; otherwise an A10 will also do for most exercises in this course.
Click "Deploy" on your chosen machine. A new options menu will open. Do the following:
- You can click on the "Customize Deployment" button, to give yourself more storage (I usually go with 50GB on Container Disk (Temporary) and 50GB on Volume Disk (Persistent). You might be told that there isn't enough capacity when you try to deploy, in which case go back to this menu and make the amount smaller). Click "Set Overrides".
- In the "Type to search for a template" option, choose the version of PyTorch less than version 2 (this will probably be 1.13.1).
- Click "Continue", then "Deploy" - this should launch your instance.
Once you finish this process, you should see your GPU instance is running, when you navigate to "Pods" on the left hand sidebar:

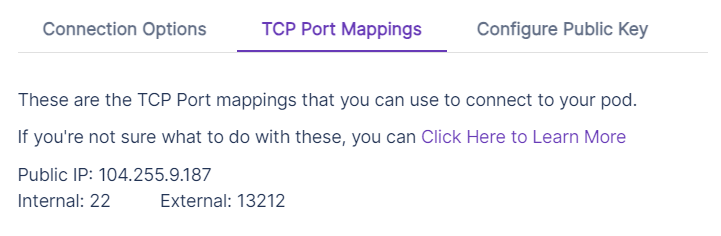
Note, you can click on the purple dropdown button on the right, press "Connect", and then "TCP Port Mappings" to get more information about your instance, which we'll need for later. This should look something like:
Connect to your instance
Now, you should set up a config file (which gives you a way to connect to your instance in a new window without the need for long command line arguments). Open the command palette (this is Ctrl + Shift + P for Windows, Cmd + Shift + P for Mac), search for the option "Open SSH Configuration File...", then click on the option C:\\Users\\<user>\\.ssh\\config for Windows / ~/.ssh/config for Linux/MacOS. If you haven't used this file before, then an empty config file will open. You should copy in the following instructions:
Host arena
    HostName <ip-address>
    User root
    IdentityFile <path-to-ssh-key>
    Port <port>
where <ip-address> and <port> are found from the information in the image above, and <path-to-ssh-key> is the path at which you saved the SSH key. For example, in my case this would look like:
Host arena
    HostName 104.255.9.187
    User root
    IdentityFile C:/Users/calsm/.ssh/arena_key
    Port 13212
Next, open the command palette again and search for "Connect to Host...". When you select this, the host arena should appear as one of the hosts - choose this option. A new VS Code window will open up. If you're asked if you want to install the recommended extensions for Python, click yes. If you're asked to choose an OS (Windows, Mac or Linux), choose Linux. When this is done, click on the file explorer icon in the top-left, and open the default directory (this will probably be ubuntu or root, on which provider you're using).
And there you go - you're all set!
Setup instructions for VastAI
Instructions for signing up
Sign up for an account here and click "SIGN IN".
Add an SSH key, by running the command ssh-keygen -t ed25519 (in Windows PowerShell if you're using Windows, or Terminal if you're using Linux / MacOS). Give it a name like arena_key (we will refer to this as arena_key from now on). Make sure you know where it was generated (later in the instructions, you'll move it into the right folder).
VS Code remote-ssh extension
The remote ssh extension is very useful for abstracting away some of the messy command-line based details of SSH. You should install this extension now.
At this point, the instructions differ between Windows and Linux/MacOS.
Windows
Having installed the SSH extension, Windows may have automatically created a .ssh file for you, and it will be placed in C:\Users\<user> by default. If it hasn't done this, then you should create one yourself (you can do this from the Windows command prompt via md C:\Users\<user>\.ssh).
Move your downloaded SSH key into this folder. Then, set permissions on the SSH key:
- Right click on file, press "Properties", then go to the "Security" tab.
- Click "Advanced", then "Disable inheritance" in the window that pops up.
- Choose the first option "Convert inherited permissions…"
- Go back to the "Security" tab, click "Edit" to change permissions, and remove every user except the owner.
- You can check who the owner is by going back to "Security -> Advanced" and looking for the "Owner" field at the top of the window).
Linux / MacOS
- Make your
.sshdirectory using the commandsmkdir -p ~/.sshthenchmod 700 ~/.ssh. - Set permissions on the key:
chmod 600 ~/.ssh/arena_key
Launch your instance
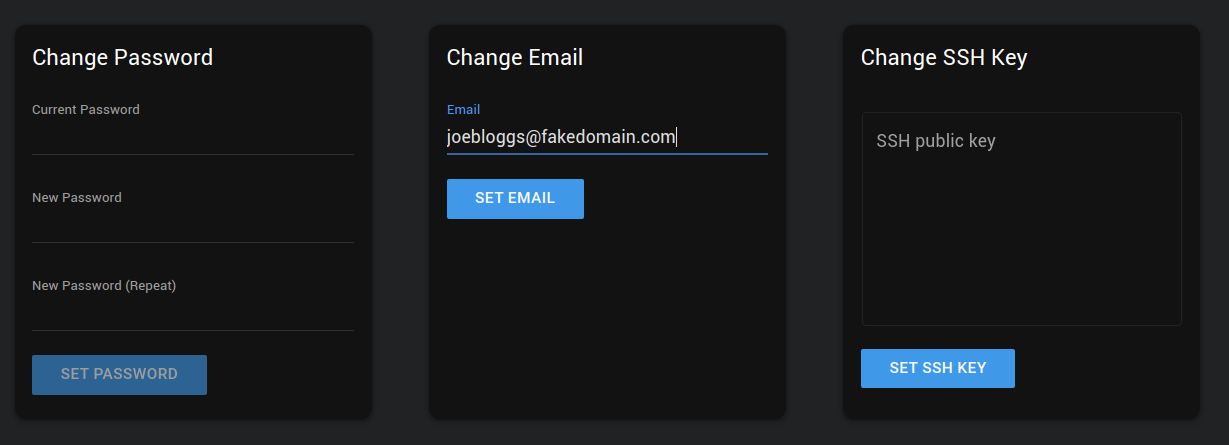
Navigate in the sidebar to "Account", and copy your ssh key into the "Change SSH Keys" text box. Click "SET SSH KEY".
Navigate in the sidebar to "Search". You'll see several options avaliable to rent, and sliders to filter by GPU type, RAM, HDD space, etc.
Filter by
- at least 50GB of disk space
- at least 100Mbps of bandwidth
- One of the GPUs in the above table (RTX 3000-series, A4000, A5000, V10).
Click "Rent" to spin up your machine.
You can view the state of the machine under the "Instances" tab.

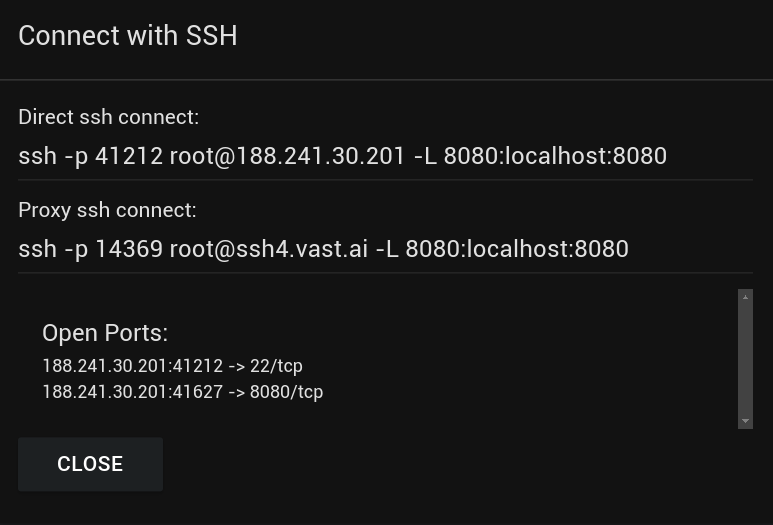
You can also get information about your instance by clicking the blue "Open SSH Interface" button - we'll need this information for later. You should see something like this:
Connect to your instance
Now, you should set up a config file (which gives you a way to connect to your instance in a new window without the need for long command line arguments). Open the command palette (this is Ctrl + Shift + P for Windows, Cmd + Shift + P for Mac), search for the option "Open SSH Configuration File...", then click on the option C:\\Users\\<user>\\.ssh\\config for Windows / ~/.ssh/config for Linux/MacOS. If you haven't used this file before, then an empty config file will open. You should copy in the following instructions:
Host arena
    HostName <ip-address>
    User <user>
    IdentityFile <path-to-ssh-key>
    Port <port>
where <ip-address>, <user> and <port> are found from the information in the image above (in the "Direct ssh connect" line), and <path-to-ssh-key> is the path at which you saved the SSH key. For example, in my case this would look like:
Host arena
    HostName 188.241.30.201
    User root
    IdentityFile C:/Users/calsm/.ssh/arena_key
    Port 41212
Next, open the command palette again and search for "Connect to Host...". When you select this, the host arena should appear as one of the hosts - choose this option. A new VS Code window will open up. If you're asked if you want to install the recommended extensions for Python, click yes. If you're asked to choose an OS (Windows, Mac or Linux), choose Linux. When this is done, click on the file explorer icon in the top-left, and open the default directory (this will probably be ubuntu or root, on which provider you're using).
And there you go - you're all set!
Workspace setup (all providers)
After connecting to your VM, open the VS Code terminal (Ctrl+Backtick / Cmd+Backtick) and run:
git clone https://github.com/callummcdougall/ARENA_3.0.git
ARENA_3.0/install.sh
Install the Python and Jupyter extensions (and optionally Ruff for autoformatting).
Once complete, select arena-env as your Python interpreter (Command Palette → "Python: Select Interpreter").
Verify your GPU with nvidia-smi or torch.cuda.get_device_name().
Feedback
Report bugs or suggestions in the Slack group (errata or suggestions channels). PRs are welcome - edit solutions.py or the markdown files in infrastructure/master_files for easiest review.