1️⃣ Introduction to nnsight
Learning Objectives
- Learn the basics of the
nnsightlibrary, and what it can be useful for- Learn some basics of HuggingFace models (e.g. tokenization, model output)
- Use it to extract & visualise GPT-J-6B's internal activations
Remote execution
We'll start by discussing remote execution - the ability nnsight has to run models on an external server, which is one of the major benefits of the library as a research tool. This helps you bypass the memory & computational limits you might be faced with on your own machine. For remote execution to work, you need 2 things:
- An API key fromm the community Discord, which you can request here (use Google as an identity provider, if no other provider is more appropriate for you)
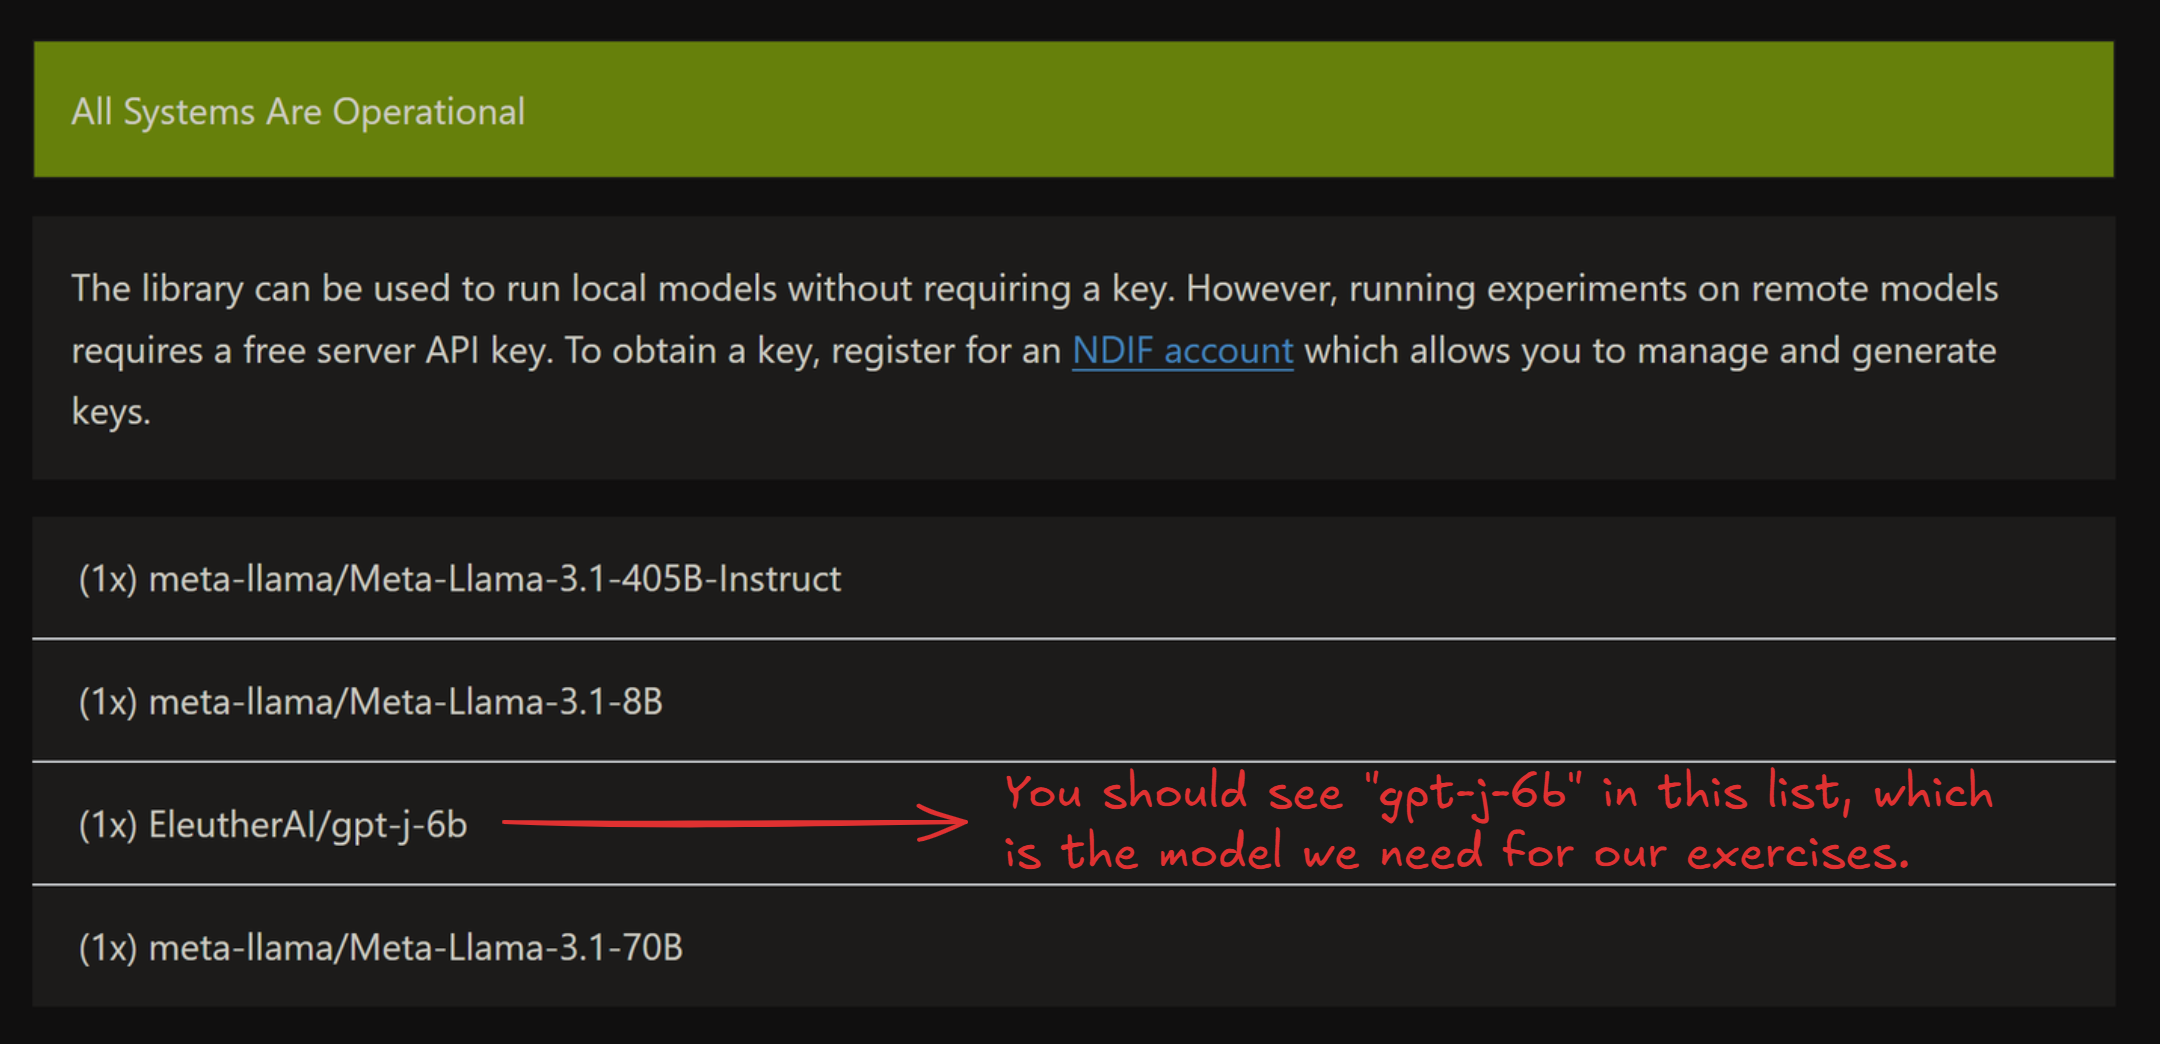
- The model you're working with being live - you can see all live models in the status page here
Note that the status page sometimes takes ~5 minutes to load all live models - click the dropdown below to see an example of what the status page should look like once the models have loaded. If you can't see the model you're looking for in this list, then you should set REMOTE=False for these exercises, or else make a request to the NDIF Discord to get the model live.
Example status page
Important syntax
Here, we'll discuss some important syntax for interacting with nnsight models. Since these models are extensions of HuggingFace models, some of this information (e.g. tokenization) applies to plain HuggingFace models as well as nnsight models, and some of it (e.g. forward passes) is specific to nnsight, i.e. it would work differently if you just had a standard HuggingFace model. Make sure to keep this distinction in mind, otherwise syntax can get confusing!
Model config
Each model comes with a model.config, which contains lots of useful information about the model (e.g. number of heads and layers, size of hidden layers, etc.). You can access this with model.config. Run the code below to see this in action, and to define some useful variables for later.
model = LanguageModel("EleutherAI/gpt-j-6b", device_map="auto", torch_dtype=t.bfloat16)
tokenizer = model.tokenizer

N_HEADS = model.config.n_head
N_LAYERS = model.config.n_layer
D_MODEL = model.config.n_embd
D_HEAD = D_MODEL // N_HEADS

print(f"Number of heads: {N_HEADS}")
print(f"Number of layers: {N_LAYERS}")
print(f"Model dimension: {D_MODEL}")
print(f"Head dimension: {D_HEAD}\n")

print("Entire config: ", model.config)
Number of heads: 16
Number of layers: 28
Model dimension: 4096
Head dimension: 256

Entire config:  GPTJConfig {
  "_name_or_path": "EleutherAI/gpt-j-6b",
  "activation_function": "gelu_new",
  "architectures": [
    "GPTJForCausalLM"
  ],
  "attn_pdrop": 0.0,
  "bos_token_id": 50256,
  "embd_pdrop": 0.0,
  "eos_token_id": 50256,
  "gradient_checkpointing": false,
  "initializer_range": 0.02,
  "layer_norm_epsilon": 1e-05,
  "model_type": "gptj",
  "n_embd": 4096,
  "n_head": 16,
  "n_inner": null,
  "n_layer": 28,
  "n_positions": 2048,
  "resid_pdrop": 0.0,
  "rotary": true,
  "rotary_dim": 64,
  "scale_attn_weights": true,
  "summary_activation": null,
  "summary_first_dropout": 0.1,
  "summary_proj_to_labels": true,
  "summary_type": "cls_index",
  "summary_use_proj": true,
  "task_specific_params": {
    "text-generation": {
      "do_sample": true,
      "max_length": 50,
      "temperature": 1.0
    }
  },
  "tie_word_embeddings": false,
  "tokenizer_class": "GPT2Tokenizer",
  "torch_dtype": "bfloat16",
  "transformers_version": "4.44.2",
  "use_cache": true,
  "vocab_size": 50400
}
Tokenizers
A model comes with a tokenizer, accessable with model.tokenizer (just like TransformerLens). Unlike TransformerLens, we won't be using utility functions like model.to_str_tokens, instead we'll be using the tokenizer directly. Some important functions for today's exercises are:
tokenizer(i.e. just calling it on some input)- This takes in a string (or list of strings) and returns the tokenized version.
- It will return a dictionary, always containing
input_ids(i.e. the actual tokens) but also other things which are specific to the transformer model (e.g.attention_mask- see dropdown). - Other useful arguments for this function:
return_tensors- if this is"pt", you'll get results returned as PyTorch tensors, rather than lists (which is the default).padding- if True (default is False), the tokenizer can accept sequences of variable length. The shorter sequences get padded at the beginning (see dropdown below for more).
tokenizer.decode- This takes in tokens, and returns the decoded string.
- If the input is an integer, it returns the corresponding string. If the input is a list / 1D array of integers, it returns all those strings concatenated (which can sometimes not be what you want).
tokenizer.batch_decode- Equivalent to
tokenizer.decode, but it doesn't concatenate. - If the input is a list / 1D integer array, it returns a list of strings. If the input is 2D, it will concatenate within each list.
- Equivalent to
tokenizer.tokenize- Takes in a string, and returns a list of strings.
Run the code below to see some examples of these functions in action.
# Calling tokenizer returns a dictionary, containing input ids & other data.
# If returned as a tensor, then by default it will have a batch dimension.
print(tokenizer("This must be Thursday", return_tensors="pt"))

# Decoding a list of integers, into a concatenated string.
print(tokenizer.decode([40, 1239, 714, 651, 262, 8181, 286, 48971, 12545, 13]))

# Using batch decode, on both 1D and 2D input.
print(tokenizer.batch_decode([4711, 2456, 481, 307, 6626, 510]))
print(tokenizer.batch_decode([[1212, 6827, 481, 307, 1978], [2396, 481, 428, 530]]))

# Split sentence into tokens (note we see the special Ġ character in place of prepended spaces).
print(tokenizer.tokenize("This sentence will be tokenized"))
{'input_ids': tensor([[1212, 1276,  307, 3635]]), 'attention_mask': tensor([[1, 1, 1, 1]])}
I never could get the hang of Thursdays.
['These', ' words', ' will', ' be', ' split', ' up']
['This sentence will be together', 'So will this one']
['This', 'Ġsentence', 'Ġwill', 'Ġbe', 'Ġtoken', 'ized']
Note on attention_mask (optional)
attention_mask, which is a series of 1s and 0s. We mask attention at all 0-positions (i.e. we don't allow these tokens to be attended to). This is useful when you have to do padding. For example:
model.tokenizer(["Hello world", "Hello"], return_tensors="pt", padding=True)
will return:
{
    'attention_mask': tensor([[1, 1], [0, 1]]),
    'input_ids': tensor([[15496,   995], [50256, 15496]])
}
We can see how the shorter sequence has been padded at the beginning, and attention to this token will be masked.
Model outputs
At a high level, there are 2 ways to run our model: using the trace method (a single forward pass) and the generate method (generating multiple tokens). We'll focus on trace for now, and we'll discuss generate when it comes to multi-token generation later.
The default behaviour of forward passes in normal HuggingFace models is to return an object containing logits (and optionally a bunch of other things). The default behaviour of trace in nnsight is to not return anything, because anything that we choose to return is explicitly returned inside the context manager.
Below is the simplest example of code to run the model (and also access the internal states of the model). Run it and look at the output, then read the explanation below. Remember to obtain and set an API key first if you're using remote execution!
# If you have an API key & want to work remotely, then set REMOTE = True and replace "YOUR-API-KEY"
# with your actual key. If not, then leave REMOTE = False.
REMOTE = False
if REMOTE:
    CONFIG.set_default_api_key("YOUR-API-KEY")

prompt = "The Eiffel Tower is in the city of"

with model.trace(prompt, remote=REMOTE):
    # Save the model's hidden states
    hidden_states = model.transformer.h[-1].output[0].save()

    # Save the model's logit output
    logits = model.lm_head.output[0, -1].save()

# Get the model's logit output, and it's next token prediction
print(f"logits.shape = {logits.shape} = (vocab_size,)")
print("Predicted token ID =", predicted_token_id := logits.argmax().item())
print(f"Predicted token = {tokenizer.decode(predicted_token_id)!r}")

# Print the shape of the model's residual stream
print(f"\nresid.shape = {hidden_states.shape} = (batch_size, seq_len, d_model)")
logits.shape = torch.Size([50400]) = (vocab_size,)
Predicted token ID = 6342
Predicted token = ' Paris'

resid.shape = torch.Size([1, 10, 4096]) = (batch_size, seq_len, d_model)
Lets go over this piece by piece.
First, we create a context block by calling .trace(...) on the model object. This denotes that we wish to generate tokens given some prompts.
with model.trace(prompt, remote=REMOTE):
By default, running this will cause your model to be loaded & run locally, but by passing remote=REMOTE, it causes the model to be run on the server instead. This is very useful when working with models too large to fit on your machine (or even models which can fit on your machine, but run slowly due to their size, however if you're running this material on a sufficiently large GPU, you may prefer to set REMOTE=False). The input argument can take a variety of formats: strings, lists of tokens, tensors of tokens, etc. Here, we've just used a string prompt.
The most interesting part of nnsight is the ability to access the model's internal states (like you might already have done with TransformerLens). Let's now see how this works!
hidden_states = model.transformer.h[-1].output[0].save()
On this line we're saying: within our forward pass, access the last layer of the transformer model.transformer.h[-1], access this layer's output .output (which is a tuple of tensors), index the first tensor in this tuple .output[0], and save it .save().
Let's break down this line in a bit more detail:
model.transformer.h[-1]is a module in our transformer.- If you
print(model), you'll see that it consists oftransformerandlm_head(for "language modelling head"). Thetransformermodule is made up of embeddings & dropout, a series of layers (called.h, for "hidden states"), and a final layernorm. So indexing.h[-1]gives you the final layer. - Note - it's often useful to visit the documentation page for whatever model you're working on, e.g. you can find GPT-J here. Not all models will have a nice uniform standardized architecture like you might be used to in TransformerLens!
- If you
.output[0]gives you this module's output, as a proxy.- The output of a module is often a tuple (again, you can see on the documentation page what the output of each module is). In this case, it's a tuple of 2 tensors, the first of which is the actual layer output (the thing we want).
- Doing operations on a proxy still returns a proxy - this is why we can index into the
outputproxy tuple and get a proxy tensor!
.save()takes this proxy output, and returns the actual object (which you can now access outside the context manager).
A bit more detail on save (optional)
To be more specific, .save() informs the intervention computational graph to clone the value of a proxy, allowing us to access the value of a proxy after the forward pass.
During processing of the intervention computational graph we are building, when the value of a proxy is no longer needed, its value is dereferenced and destroyed. If you've saved it, then you'll be able to access the value of the proxy after this happens (i.e. outside the context manager).
Optional exercise - we mentioned that .output returns a tuple of 2 tensors. Can you use the documentation page what the second tensor in this tuple is?
The second output is also a tuple of tensors, of length 2. In the GPT-J source code, they are called present. They represent the keys and values which were calculated in this forward pass (as opposed to those that were calculated in an earlier forward pass, and cached by the model). Since we're only generating one new token, these are just the full keys and values.
The next command:
logits = model.lm_head.output[0, -1].save()
can be understood in a very similar way. The only difference is that we're accessing the output of lm_head, the language modelling head (i.e. the unembedding at the very end), and the output is just a tensor of shape (batch, seq, d_vocab) rather than a tuple of tensors. Again, see the documentation page for this.
If you've worked with Hugging Face models then you might be used to getting logits directly from the model output, but here we generally extract logits from the model internals just like any other activation because this allows us to control exactly what we return. If we return lots of very large tensors, this can take quite a while to download from the server (remember that d_vocab is often very large for transformers, i.e. around 50k). See the "which objects to save" section below for more discussion on this.
Output vs input
You can also extract a module's input using .input or .inputs. If a module's forward method is called as module.forward(*args, **kwargs) then .inputs returns a tuple of (tuple_of_args, dict_of_kwargs). Alternatively, .input is an alias for .inputs[0][0], in other words it returns the first arg from the module's forward method (which is usually the tensor we want).
Remember that if you're not sure then you can debug with print(module.input.shape) - even if .inputs is a tuple of inputs, this will work to recursively print the shape of all the tensors in the tuple, rather than causing an error.
Which objects to save
Note that we saved logits above, which is a vector of length 50k. In general, it's best to save as small an object as possible, because this reduces the size of object you'll have to download from the server. For example, if you only want the next token completions, just argmax the logits and then save the result! All basic tensor operations can be performed within your context manager.
Putting this into practice
Exercise - visualize attention heads
We just covered a lot of content, so lets put it into practice. Your first task is to extract the attention patterns from the zeroth layer of the transformer, and visualize them using circuitsvis. As a reminder, the syntax for circuitsvis is:
cv.attention.attention_patterns(
    tokens=tokens,
    attention=attention,
)
where tokens is a list of strings, and attention is a tensor of shape (num_heads, num_tokens, num_tokens).
If you're stuck, here's a link to the source code for GPT-J. Look for how the attention patterns are calculated, within the GPTJAttention block.
Note - this model uses dropout on the attention probabilities, as you'll probably notice from looking at the source code in the link above. This won't affect the model's behaviour because dropout is disabled in inference mode (and using the generate method always puts a model in inference mode). But it is still a layer which exists in the model, so you can access its input or output just like any other module.
Aside - inference mode
Dropout is one of the two main layers whose behaviour changes in inference mode (the other is BatchNorm).
If you want to run the model without inference mode, you can wrap your code in with model.trace(inference=False):. However, you don't need to worry about this for the purposes of these exercises.
If you're stuck on how to reference the right module, see the following hint:
Hint - what module you should get attention from
You want to extract attention from model.transformer.h[0].attn.attn_dropout.input. If you used .output, it would give you the same values (although they might differ by a dummy batch dimension). Both of these will return a single tensor, because dropout layers take just one input and return just one output.
Aside - GPT2 tokenizer uses special characters to represent space
GPT2 tokenizer uses "Ġ" to represent prepended space. So ["My", " name", " is", " James"] will be tokenized as ["My", "Ġname", "Ġis", "ĠJames"]. Make sure you replace "Ġ" with an actual space.
# YOUR CODE HERE - extract and visualize attention
Click to see the expected output
Solution (and explanation)
with model.trace(prompt, remote=REMOTE):
    attn_patterns = model.transformer.h[0].attn.attn_dropout.input.save()
# Get string tokens (replacing special character for spaces)
str_tokens = model.tokenizer.tokenize(prompt)
str_tokens = [s.replace('Ġ', ' ') for s in str_tokens]
# Attention patterns (squeeze out the batch dimension)
attn_patterns_value = attn_patterns.squeeze(0)
print("Layer 0 Head Attention Patterns:")
display(cv.attention.attention_patterns(
    tokens=str_tokens,
    attention=attn_patterns_value,
))
Explanation:
Within the context managers: We access the attention patterns by taking the input to theattn_dropout.
From the GPT-J source code, we can see that the attention weights are calculated by standard torch functions (and an unnamed nn.Softmax module) from the key and query vectors, and are then passed through the dropout layer before being used to calculate the attention layer output. So by accessing the input to the dropdown layer, we get the attention weights before dropout is applied.
Because of the previously discussed point about dropout not working in inference mode, we could also use the output of attn_dropout, and get the same values.
We use the .save() method to save the attention patterns (as an object).
Outside of the context managers:
* We use the tokenize method to tokenize the prompt.
As an optional bonus exercise, you can verify for yourself that these are the correct attention patterns, by calculating them from scratch using the key and query vectors. Using model.transformer.h[0].attn.q_proj.output will give you the query vectors, and k_proj for the key vectors. However, one thing to be wary of is that GPT-J uses rotary embeddings, which makes the computation of attention patterns from keys and queries a bit harder than it would otherwise be. See here for an in-depth discussion of rotary embeddings, and here for some rough intuitions.