4️⃣ Video & Lighting
Learning Objectives
- Learn how surface normal vectors can be used to compute lighting effects
- Render your figures in video form (as an animated camera pan)
- (optional) Learn about the
pytestlibrary, and write your own tests for the functions you wrote
Here, we've included some more raytracing exercises, which extend the previous animation by providing video and lighting.
Exercise - rotation matrix
```yaml Difficulty: 🔴🔴⚪⚪⚪ Importance: 🔵🔵🔵⚪⚪
You should spend up to 10-15 minutes on this exercise. ```
Below is some code to iterate through a range of angles, rotating the pikachu model around the y-axis and raytracing the mesh at each angle. These frames are then concatenated together and animated into some dramatic footage! Your job is to fill in the rotation_matrix function, which should give you a matrix that rotates counterclockwise around the y-axis by a given angle theta (which is a scalar tensor). If you're stuck, see this Wikipedia page on basic 3D rotations.
def rotation_matrix(theta: Float[Tensor, ""]) -> Float[Tensor, "rows cols"]:
    """
    Creates a rotation matrix representing a counterclockwise rotation of `theta` around the y-axis.
    """
    raise NotImplementedError()


tests.test_rotation_matrix(rotation_matrix)
Solution
def rotation_matrix(theta: Float[Tensor, ""]) -> Float[Tensor, "rows cols"]:
    """
    Creates a rotation matrix representing a counterclockwise rotation of theta around the y-axis.
    """
    return t.tensor(
        [
            [t.cos(theta), 0.0, t.sin(theta)],
            [0.0, 1.0, 0.0],
            [-t.sin(theta), 0.0, t.cos(theta)],
        ]
    )
Once you've passed the tests, you can run the code below to create an animation! It might take a while to run, but should be no longer than 2 minutes.
def raytrace_mesh_video(
    rays: Float[Tensor, "nrays points dim"],
    triangles: Float[Tensor, "ntriangles points dims"],
    rotation_matrix: Callable[[float], Float[Tensor, "rows cols"]],
    raytrace_function: Callable,
    num_frames: int,
) -> Bool[Tensor, "nframes nrays"]:
    """
    Creates a stack of raytracing results, rotating the triangles by `rotation_matrix` each frame.
    """
    result = []
    theta = t.tensor(2 * t.pi) / num_frames
    R = rotation_matrix(theta)
    for theta in tqdm(range(num_frames)):
        triangles = triangles @ R
        result.append(raytrace_function(rays, triangles))
        t.cuda.empty_cache()  # clears GPU memory (this line will be more important later on!)
    return t.stack(result, dim=0)


def display_video(distances: Float[Tensor, "frames y z"]):
    """
    Displays video of raytracing results, using Plotly. `distances` is a tensor where the [i, y, z]
    element is distance to the closest triangle for the i-th frame & the [y, z]-th ray in our 2D
    grid of rays.
    """
    px.imshow(
        distances,
        animation_frame=0,
        origin="lower",
        zmin=0.0,
        zmax=distances[distances.isfinite()].quantile(0.99).item(),
        color_continuous_scale="viridis_r",  # "Brwnyl"
    ).update_layout(
        coloraxis_showscale=False, width=550, height=600, title="Raytrace mesh video"
    ).show()


num_pixels_y = 250
num_pixels_z = 250
y_limit = z_limit = 0.8
num_frames = 50

rays = make_rays_2d(num_pixels_y, num_pixels_z, y_limit, z_limit)
rays[:, 0] = t.tensor([-3.0, 0.0, 0.0])
dists = raytrace_mesh_video(rays, triangles, rotation_matrix, raytrace_mesh, num_frames)
dists = einops.rearrange(dists, "frames (y z) -> frames y z", y=num_pixels_y)

display_video(dists)
Click to see the expected output
Exercise - use GPUs
```yaml Difficulty: 🔴⚪⚪⚪⚪ Importance: 🔵🔵🔵⚪⚪
You should spend up to 10-15 minutes on this exercise. ```
We'll discuss GPUs a lot more in later sections and exercises. For now, One last thing to discuss before we move onto training our model: GPUs. Essentially, the GPU (graphics processing unit) is a specialized processor for rendering graphics and doing other kinds of parallel processing. Although we are actually using it for graphics in this section, it's much better known today for its role in deep learning, since it allows for efficient parallelized computations.
When you create a tensor, by default it's located on the CPU. You can use the to method to move your tensor between devices, e.g. x = x.to("cuda") to move to the GPU, and x = x.to("cpu") to move back to the CPU (or x = x.cuda() and x = x.cpu() as a shorthand). CUDA stands for Compute Unified Device Architecture, a parallel computing platform and programming model developed by NVIDIA which is supported by PyTorch. Note that this method returns a copy of the tensor rather than the tensor itself (unless the to command doesn't change its device). You can check whether CUDA is available by calling t.cuda.is_available() - if it's not, you can try installing a CUDA-supporting version of PyTorch from the homepage.
Below, you should write the raytrace_mesh_gpu function to be identical to raytrace_mesh, except that the computation should be done on the GPU. This means triangles and rays should be moved to the GPU before the computation is done, and the returned object should be moved back to the CPU before finishing.
def raytrace_mesh_gpu(
    rays: Float[Tensor, "nrays rayPoints=2 dims=3"],
    triangles: Float[Tensor, "ntriangles trianglePoints=3 dims=3"],
) -> Float[Tensor, "nrays"]:
    """
    For each ray, return the distance to the closest intersecting triangle, or infinity.

    All computations should be performed on the GPU.
    """
    raise NotImplementedError()


dists = raytrace_mesh_video(rays, triangles, rotation_matrix, raytrace_mesh_gpu, num_frames)
dists = einops.rearrange(dists, "frames (y z) -> frames y z", y=num_pixels_y)
display_video(dists)
Click to see the expected output
Solution
def raytrace_mesh_gpu(
    rays: Float[Tensor, "nrays rayPoints=2 dims=3"],
    triangles: Float[Tensor, "ntriangles trianglePoints=3 dims=3"],
) -> Float[Tensor, "nrays"]:
    """
    For each ray, return the distance to the closest intersecting triangle, or infinity.
    All computations should be performed on the GPU.
    """
    NR = rays.size(0)
    NT = triangles.size(0)
    device = "cuda"
    triangles = triangles.to(device)
    rays = rays.to(device)
# Each triangle is [[Ax, Ay, Az], [Bx, By, Bz], [Cx, Cy, Cz]]
    triangles = einops.repeat(triangles, "NT pts dims -> pts NR NT dims", NR=NR)
    A, B, C = triangles
    assert A.shape == (NR, NT, 3)
# Each ray is [[Ox, Oy, Oz], [Dx, Dy, Dz]]
    rays = einops.repeat(rays, "NR pts dims -> pts NR NT dims", NT=NT)
    O, D = rays
    assert O.shape == (NR, NT, 3)
# Define matrix on left hand side of equation
    mat: Float[Tensor, "NR NT 3 3"] = t.stack([-D, B - A, C - A], dim=-1)
    # Get boolean of where matrix is singular, and replace it with the identity in these positions
    dets: Float[Tensor, "NR NT"] = t.linalg.det(mat)
    is_singular = dets.abs() < 1e-8
    mat[is_singular] = t.eye(3).to(device)
# Define vector on the right hand side of equation
    vec: Float[Tensor, "NR NT 3"] = O - A
# Solve eqns (note, s is the distance along ray)
    sol: Float[Tensor, "NR NT 3"] = t.linalg.solve(mat, vec)
    s, u, v = sol.unbind(-1)
# Scale s by Dx to get the distance along ray
    s *= D[..., 0]
# Get boolean of intersects, and use it to set distance = infinity when there is no intersection
    intersects = (s >= 0) & (u >= 0) & (v >= 0) & (u + v <= 1) & ~is_singular
    s[~intersects] = t.inf
# Get the minimum distance (over all triangles) for each ray
    return einops.reduce(s, "NR NT -> NR", "min").cpu()
dists = raytrace_mesh_video(rays, triangles, rotation_matrix, raytrace_mesh_gpu, num_frames)
dists = einops.rearrange(dists, "frames (y z) -> frames y z", y=num_pixels_y)
display_video(dists)
Exercise (bonus) - add lighting
```yaml Difficulty: 🔴🔴🔴🔴🔴 Importance: 🔵🔵⚪⚪⚪
You've done all the essential content for today at this point. You can complete this exercise for fun if you have time, or just read & run the solution! ```
We can improve our images by adding lighting, i.e. coloring triangles based on the angle of some light source rather than just from distance from the origin. The most common way to do this is using the Lambertian reflection model, which says that the intensity of the light that reflects off a surface is proportional to the cosine of the angle between the light vector and the surface normal (or equivalently, proportional to their dot product, assuming both vectors are normalized).
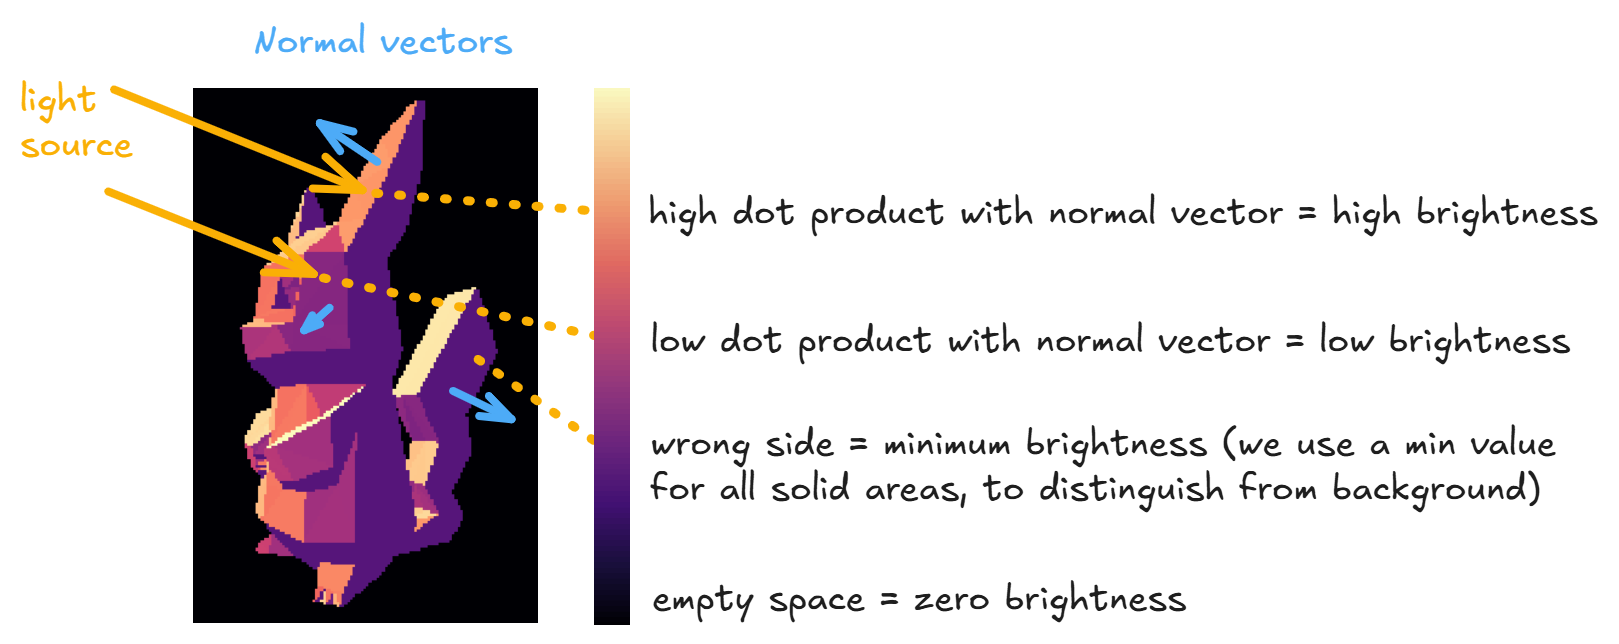
You should implement the raytrace_mesh_lambert function below, which puts this into practice. In other words, your function should return the following for each ray:
- Zero if there is no intersection, i.e. distance to every triangle is infinite
intensity + ambient_intensityif there is an interesection, whereambient_intensityis a value we give you (minimum brightness for a triangle, to distinguish it from the black background) andintensityis the intensity of light hitting the triangle, i.e. the dot product of the triangle's normal vector and the light vector, set to zero if this dot product is negative.
To emphasize - unlike in your previous functions where you used the distance of each ray to the nearest triangle to determine the color of a given ray/pixel, here every triangle has a unique intensity value and the color of a given ray/pixel is determined only by what its nearest triangle is. The only reason we still need to compute distances is to compute what (if any) the first triangle is that the ray intersects with.
def raytrace_mesh_lambert(
    rays: Float[Tensor, "nrays points=2 dims=3"],
    triangles: Float[Tensor, "ntriangles points=3 dims=3"],
    light: Float[Tensor, "dims=3"],
    ambient_intensity: float,
    device: str = "cuda",
) -> Float[Tensor, "nrays"]:
    """
    For each ray, return the intensity of light hitting the triangle it intersects with (or zero if
    no intersection).

    Args:
        rays:   A tensor of rays, with shape `[nrays, 2, 3]`.
        triangles:  A tensor of triangles, with shape `[ntriangles, 3, 3]`.
        light:  A tensor representing the light vector, with shape `[3]`. We compute the intensity
                as the dot product of the triangle normals & the light vector, then set it to be
                zero if the sign is negative.
        ambient_intensity:  A float representing the ambient intensity. This is the minimum
                            brightness for a triangle, to differentiate it from the black background
                            (rays that don't hit any triangle).
        device: The device to perform the computation on.

    Returns:
        A tensor of intensities for each of the rays, flattened over the [y, z] dimensions. The
        values are zero when there is no intersection, and `ambient_intensity + intensity` when
        there is an interesection (where `intensity` is the dot product of the triangle's normal
        vector and the light vector, truncated at zero).
    """
    raise NotImplementedError()


def display_video_with_lighting(intensity: Float[Tensor, "frames y z"]):
    """
    Displays video of raytracing results, using Plotly. `distances` is a tensor where the [i, y, z]
    element is the lighting intensity based on the angle of light & the surface of the triangle
    which this ray hits first.
    """
    px.imshow(
        intensity,
        animation_frame=0,
        origin="lower",
        color_continuous_scale="magma",
    ).update_layout(
        coloraxis_showscale=False, width=550, height=600, title="Raytrace mesh video (lighting)"
    ).show()


ambient_intensity = 0.5
light = t.tensor([0.0, -1.0, 1.0])
raytrace_function = partial(
    raytrace_mesh_lambert, ambient_intensity=ambient_intensity, light=light,
)

intensity = raytrace_mesh_video(rays, triangles, rotation_matrix, raytrace_function, num_frames)
intensity = einops.rearrange(intensity, "frames (y z) -> frames y z", y=num_pixels_y)
display_video_with_lighting(intensity)
Click to see the expected output
Help - I'm not sure how to compute the normal vectors.
You can use the torch.cross function, using two edges of the triangle as arguments. For example, you can compute the un-normalized vectors as:
normals = t.cross(triangles[:, 2] - triangles[:, 0], triangles[:, 1] - triangles[:, 0], dim=1)
which will have the same shape as each of triangles[:, i].
Help - I'm not sure how to set the intensity to zero if the light is coming from the wrong side of the triangle.
The pikachu.stl file stores triangles in a consistent orientation based on the right hand rule. Assuming you chose a consistent method for computing normal vectors like the one in the dropdown above, your computed intensity values per triangle will either all be the correct sign or all be the opposite sign to the true signed values. This means you can either use t.where(intensity > 0, intensity, 0.0) or t.where(intensity < 0, -intensity, 0.0) as your final zeroed intensity values and both should look fine (although one will look like the light source is coming from the opposite direction to the other). It doesn't matter which orientation you choose.
Solution
def raytrace_mesh_lambert(
    rays: Float[Tensor, "nrays points=2 dims=3"],
    triangles: Float[Tensor, "ntriangles points=3 dims=3"],
    light: Float[Tensor, "dims=3"],
    ambient_intensity: float,
    device: str = "cuda",
) -> Float[Tensor, "nrays"]:
    """
    For each ray, return the intensity of light hitting the triangle it intersects with (or zero if
    no intersection).
    Args:
        rays:   A tensor of rays, with shape [nrays, 2, 3].
        triangles:  A tensor of triangles, with shape [ntriangles, 3, 3].
        light:  A tensor representing the light vector, with shape [3]. We compute the intensity
                as the dot product of the triangle normals & the light vector, then set it to be
                zero if the sign is negative.
        ambient_intensity:  A float representing the ambient intensity. This is the minimum
                            brightness for a triangle, to differentiate it from the black background
                            (rays that don't hit any triangle).
        device: The device to perform the computation on.
    Returns:
        A tensor of intensities for each of the rays, flattened over the [y, z] dimensions. The
        values are zero when there is no intersection, and ambient_intensity + intensity when
        there is an interesection (where intensity is the dot product of the triangle's normal
        vector and the light vector, truncated at zero).
    """
    NR = rays.size(0)
    NT = triangles.size(0)
    triangles = triangles.to(device)
    rays = rays.to(device)
# Each triangle is [[Ax, Ay, Az], [Bx, By, Bz], [Cx, Cy, Cz]]
    triangles_repeated = einops.repeat(triangles, "NT pts dims -> pts NR NT dims", NR=NR)
    A, B, C = triangles_repeated
    assert A.shape == (NR, NT, 3)
# Each ray is [[Ox, Oy, Oz], [Dx, Dy, Dz]]
    rays_repeated = einops.repeat(rays, "NR pts dims -> pts NR NT dims", NT=NT)
    O, D = rays_repeated
    assert O.shape == (NR, NT, 3)
# Define matrix on left hand side of equation
    mat: Float[Tensor, "NR NT 3 3"] = t.stack([-D, B - A, C - A], dim=-1)
    # Get boolean of where matrix is singular, and replace it with the identity in these positions
    dets: Float[Tensor, "NR NT"] = t.linalg.det(mat)
    is_singular = dets.abs() < 1e-8
    mat[is_singular] = t.eye(3).to(device)
# Define vector on the right hand side of equation
    vec: Float[Tensor, "NR NT 3"] = O - A
# Solve eqns (note, s is the distance along ray)
    sol: Float[Tensor, "NR NT 3"] = t.linalg.solve(mat, vec)
    s, u, v = sol.unbind(-1)  # each shape [NR, NT]
# Scale s by Dx to get the distance along ray
    s *= D[..., 0]
# Get boolean of intersects, and use it to set distance = infinity when there is no intersection
    intersects = (s >= 0) & (u >= 0) & (v >= 0) & (u + v <= 1) & ~is_singular
    s[~intersects] = float("inf")
# Get the minimum distance (over all triangles) for each ray
    closest_distances, closest_triangles_for_each_ray = s.min(dim=-1)  # both shape [NR]
# Get the intensity by taking dot product of triangle normals & light vector
    normals = t.cross(
        triangles[:, 2] - triangles[:, 0], triangles[:, 1] - triangles[:, 0], dim=1
    )  # shape [NT dims]
    normals /= normals.norm(dim=1, keepdim=True)
    intensity_per_triangle = einops.einsum(normals, light.to(device), "nt dims, dims -> nt")
    intensity_per_triangle_signed = t.where(intensity_per_triangle > 0, intensity_per_triangle, 0.0)
# Get intensity for each ray, and add ambient intensity where there's an intersection
    intensity = intensity_per_triangle_signed[closest_triangles_for_each_ray] + ambient_intensity
# Set to zero if the ray doesn't intersect with any triangle
    intensity = t.where(closest_distances.isfinite(), intensity, 0.0)
return intensity.cpu()
def display_video_with_lighting(intensity: Float[Tensor, "frames y z"]):
    """
    Displays video of raytracing results, using Plotly. distances is a tensor where the [i, y, z]
    element is the lighting intensity based on the angle of light & the surface of the triangle
    which this ray hits first.
    """
    px.imshow(
        intensity,
        animation_frame=0,
        origin="lower",
        color_continuous_scale="magma",
    ).update_layout(
        coloraxis_showscale=False, width=550, height=600, title="Raytrace mesh video (lighting)"
    ).show()
ambient_intensity = 0.5
light = t.tensor([0.0, -1.0, 1.0])
raytrace_function = partial(
    raytrace_mesh_lambert, ambient_intensity=ambient_intensity, light=light,
)
intensity = raytrace_mesh_video(rays, triangles, rotation_matrix, raytrace_function, num_frames)
intensity = einops.rearrange(intensity, "frames (y z) -> frames y z", y=num_pixels_y)
display_video_with_lighting(intensity)
As a final bonus exercise before we conclude, you can try rendering with a wireframe, i.e. only including the edges of the triangles rather than the full triangle. All you have to do here is change your triangle_ray_intersects function, so that it only detects intersection at a certain subset of the parameter values u and v (can you see how to do this?).
Bonus - testing with pytest
Note - this section was also just written with VSCode in mind, so it might be less suitable for Colab, and you might consider skipping it.
To wrap up today, we're going to have a further discussion of testing. So far, our test functions have been pretty simple - we imported a test from the part1_ray_tracing/tests.py file, and ran it to compare our answers to the answers in part1_ray_tracing/solutions.py. This works perfectly fine, but there are other Python libraries which can make testing easier and more powerful. In particular, two such libraries are unittest and pytest. Both these libraries provide extensive features for modularizing and running test functions, and have nice integrations with VSCode. unittest is very powerful, but also has a steep learning curve and isn't worth the trouble of learning during a 6 week course. However, pytest is very useful and easy to learn, so we'll spend some time here discussing it.
The pytest framework makes it easy to write small, readable tests, and can scale to support complex functional testing for applications and libraries. Today we'll just discuss a few features which will be particularly useful for the kinds of tests we'll be writing, but you're welcome to explore more tests later on.
Important note - if you're working on Colab or a notebook for these exercises, your tests won't work, because in this setup we'll be importing answers from our test file, rather than importing tests from our answers file. For this reason, we won't be using pytest for the structured exercises in this course (in case anybody is following these exercises in a notebook), but you're strongly recommended to use pytest when you're working from .py files instead - which is strongly recommended during much of the bonus content.
First, look at part1_ray_tracing/tests.py. The tests in this file all follow a similar pattern: evaluate your function on some input, check it equals the solution. This is a clear sign that we can use modularization to simplify our code! Compare this file to part1_ray_tracing/test_with_pytest.py, which contains the same tests but refactored using pytest. The latter is clearly separated into three sections: one for library imports, one for defining the inputs we'll use for our test functions, and one where we define our test functions.
Parametrization
We use pytest.mark.parametrize to parametrize our tests. This means we can run the same test a bunch of different times on different inputs. In the non-pytest version, we did this by defining different functions (e.g. test_intersect_ray_1d and test_intersect_ray_1d_special_case), but this isn't necessary here.
The syntax of a function decorated by pytest.mark.parametrize is:
@pytest.mark.parametrize("arg1, arg2, arg3", [
    (val1, val2, val3),
    (val4, val5, val6),
    ...
])
def test_function(arg1, arg2, arg3):
    ...
This will result in running test_function multiple times, the first time with arg1=val1, arg2=val2, arg3=val3, and the second time with arg1=val4, arg2=val5, arg3=val6, etc. This is a much better way to write tests, because it makes it easy for us to add new test cases without having to write new functions.
How to run these tests?
There are three ways to run the above tests:
- From the terminal
You can run them from the command line using the pytest command. Open your terminal in VSCode at the bottom of the screen, make sure you're in the directory chapter0_fundamentals, then enter the command pytest. This will search the current directory (or subdirectories) for any python files with the prefix test_, and within that file run all functions with the prefix test_ (i.e. all the tests for these exercises).
You can also add more complicated commands, like:
pytest test_intersect_ray_1dto specify the file to run tests from-
pytest test_intersect_ray_1d::test_intersect_ray_1dto specify the file and test function -
From your Python file
To do this, you need to call pytest.main (make sure this is wrapped in an if MAIN block). The first argument of this function is a list of args to pytest. This has analogous syntax to the command line option, for instance here are a few ways you can do this:
if MAIN:
    pytest.main([])
    pytest.main(["test_part1_ray_tracing.py"])
    pytest.main(["test_part1_ray_tracing.py::test_intersect_ray_1d"])
- From VSCode's testing display
This is by far the most useful way to run test functions. VSCode provides a helpful interface to run all test functions in your directory, and see which of them have passed. First, press the test icon on the left hand sidebar (it will look like a triangular flask). If this is your first time, then you'll need to click on the Configure Python Tests button, then select pytest as your framework (you may have to install pytest when prompted). This should automatically perform test discovery for you, showing you all the test files & functions in your current directory in the left hand window (it detects this the same way pytest does, using the test_ prefix). You can hover over tests or files to see options like "run test(s)" or debug test(s)". When you run them, you'll see a tick or cross appear next to the test, indicating whether it passed or failed.
This is a very useful interface when you're working on a large project, because as you make updates you can easily re-run all tests, then identify & fix problems.
Help - I get Error discovering pytest tests
Try opening your terminal (at the bottom of the screen) and running pytest --collect-only. This should print output that helps you diagnose the problem.
One possible issue is changing directories within your python files (e.g. with os.chdir), because this can often confuse PyTest's search for tests.
Aside - # type: ignore
Note that the test file has the annotation # type: ignore at the end of an import line, at the top of the file. This is because VSCode's typechecker will complain when you try and import a file that doesn't exist yet! This line removes the type error, and allows you to write functions without all those annoying squiggly red lines! However, don't overuse this annotation, because it can often be a signal that you've made a mistake in your code, or else have followed a bad coding practice.
Aside - named tuples
Another way you can clean this code up is to use named tuples. These are an especially nice and Pythonic structure which maintains the features of a tuple, but also allows you to define instances & access elements by name. For instance, instead of:
ray_segment_batch = (
    solutions.rays1d,
    solutions.segments
)
you could have:
from collections import namedtuple
TestCase = namedtuple("TestCase", "rays segments")
ray_segment_batch = TestCase(
    rays = solutions.rays1d,
    segments = solutions.segments
)
and this ray_segment_batch object would still be treated like a tensor when it's used in a parameterized test.